
The message can be recalled or replaced if you and your recipients are all using Microsoft Exchange as a communication platform. So here is the guide on how to recall an email in Outlook to make your work easier.
how to recall an email in Outlook
Possibly you sent a scathing email to someone on the spur of the moment. Alternatively, you can have sent a work email and simply neglected to attach a document that your coworkers want.
Using Outlook, you can recall an email message. If you want to get it back, you’re in luck, at least, if you’re using Outlook to do it. This is because Microsoft’s email client includes a built-in solution for circumstances such as these. An email recall can prevent a receiver from seeing an unfinished, angry, or otherwise unpleasant email that you send to him or her. If you wish to learn how to recall an email in Outlook, you should follow the steps outlined below.
How to retrieve emails from Outlook
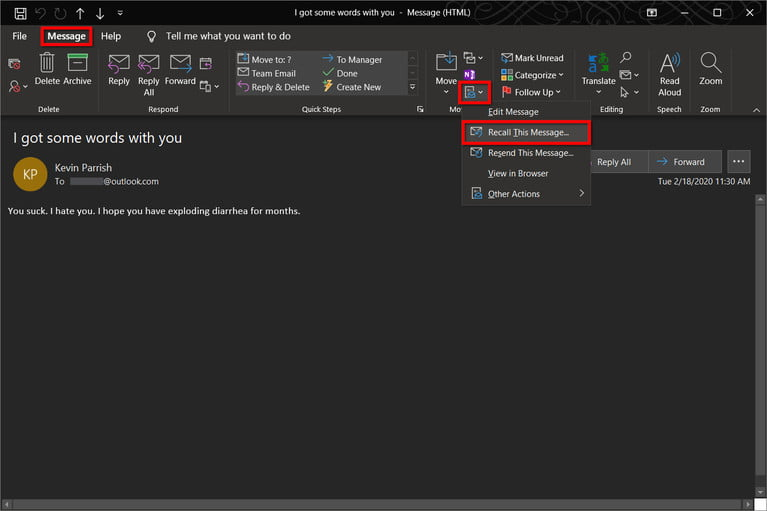
Step 1- To recall an email, go in your Sent Items folder and find the one you wish to bring back. It will be at the top of the list. When you choose the email you wish to recall, you can click on the email and then click on Recall.
Step 2-Select Message from the drop-down option to make the Message tab on the toolbar active. When you go to the Move section, choose the More Move Actions option.
Step 3- Pick the option to Recall This Message from the drop-down menu.
Step 4- A pop-up window appears on your screen in the fourth stage. Select one of the two options from the drop-down box. If you’re using a smartphone or other electronic device, choose Delete Unread Copies of This Message. If you’re using a tablet or a traditional phone, choose Delete Unread Copies and Replace With an Older Message. Once you’ve made your selection, click the ‘Continue’ button.

Step 5– If you select to generate a replacement message, Outlook shows a second page where you can make any necessary changes to the original message. Outlook recalls your previous message and shows a notice while you are composing your new message. When you’re through writing the updated message, just click the Send button to send it.
Please keep in mind that sending a recall email does not completely remove your old email from the system. The receiver may need to open the recall message first for the original message to be deleted. This is why you should include the word “URGENT” or anything similar in the headline of the recall letter to ensure that it gets opened before the first offending email arrives.
Furthermore, Microsoft notes that the receiver can be alerted in some circumstances when recalled messages are removed from their inbox. So keep in mind that even if you recall an email in outlook, the receiver will still be aware that a flawed or inappropriate communication has been sent to them, even if they are unable to read the letter itself.
Read also: how to add a calendar in outlook
Why does email recall not always function properly?
While it appears to be a straightforward process, recall email will not always operate the way you want it to. Because of today’s internet speeds, the incorrect email is very certainly already in the mailbox of someone else, which causes several problems. It will be difficult to get your email, as there are several distractions

Following are some of the issues that might derail your initiatives or complicate matters.
- Opened email.
If your email is opened on the way to the recipient, you will be unable to retrieve it. However, if the receiver opens their Outlook email, they will still be able to see the second recall letter, but the original message will be deleted.
- Redirects to the other folder
The recall will fail if your initial mail activated a filter, and Outlook redirected it to a different folder. The recall option only applies to emails that have not yet been deleted from the inbox.
- Public Folders
When your mail is lurking in a public folder, it will not be recalled if someone sees it before it is recalled.
As previously stated, recalls are not without their flaws, and your efforts can be thwarted by reasons beyond your control. If you discover that you are attempting recalls that are not successful, examine the following two alternatives:
Solution 1- Write an apology email to the recipient. This is probably the easiest remedy to the problem of recall an email in Outlook, other than double-checking to make sure your emails are being delivered to the appropriate recipients. For those occasions when you mistakenly send an email to the wrong recipient or set of recipients and the email was not very scandalous, simply admitting your error and apologizing might save you time and effort. An honest apology is typically warmly received, and it can even help to establish trust between the parties involved.
Solution 2- Delay the sending of your emails so that they do not go out immediately. If you’re frequently responding to emails, sending sensitive information back and forth, or just prone to making mistakes, you should consider postponing your email responses. If you follow these easy procedures, you can simply configure this for all of your Outlook email messages:
Step 1: In Outlook, go to the File menu in the upper-left corner.
Step 2: From the drop-down option, scroll down a little and select Manage Rules & Alerts.
Step 3: You will see a window named Rules and Alerts on your computer’s screen. To create a new rule, choose the choice from this menu. This will happen again, as another pop-up window will emerge. Close the message and dismiss it.
Step 4- Here, choose Apply Rules on Messages I Send from the drop-down menu. If you look closely, you will find that this is stated under the Start From a Blank Rule section. To proceed, click on the Next button.
Step 5: Don’t be concerned about anything else on the criteria list, and simply click Next to proceed. After that, you will see a message confirming that your action was successful. To complete this action, please pick “Yes” from the drop-down option.
Step 6- In the Defer Delivery by Number of Minutes step, select the Defer Delivery by Number of Minutes option. Enter a number from the drop-down menu, then select the Several links. As soon as you begin your session, you will notice a pop-up page appear, which will invite you to pick the length of your experience. Next, click the OK button.
Step 7- The last step is to decide which exceptions you would like to apply. After that, click the Next button to proceed.
Step 8- Once you’ve made your last adjustment, click the “Turn On This Rule” option to turn the rule on. To complete the task, click the Finish button.
